Cloudflare DNS Manager

If you manage multiple domains in Cloudflare, small DNS changes can add up to a lot of clicks. The built‑in UI is great for one zone, but less convenient when you jump between many zones or handle frequent cut‑overs.

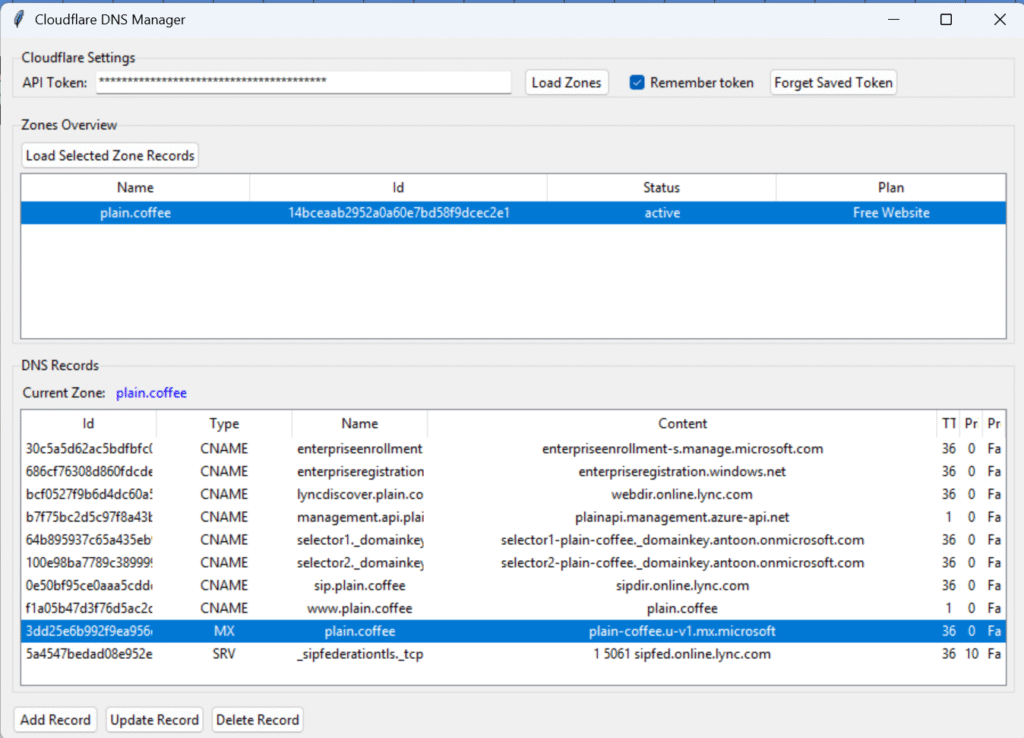
Cloudflare DNS Manager is a lightweight Windows desktop app that sits in between. It uses Cloudflare’s API to list your zones and edit DNS records in a single, fast, searchable view. You authenticate with a Cloudflare API token, not the global API key, so you can limit access to exactly what is needed.

Who it is for

  • Every organization that want specific people to manage specific domains on Cloudflare without access to the admin portal
  • DevOps, support and on-call engineers handling urgent cut‑overs
  • Teams that prefer a simple UI, quick UI, over the advanced but bloated Cloudflare web interface

What you can do

  • Load all zones tied to your token, then browse records per zone
  • Add, update, or delete DNS records with a couple of clicks
  • Filter and sort by name, type, TTL, priority and proxied status
  • Work with a least‑privilege API token that you can revoke at any time

How it works under the hood

  • The app connects to Cloudflare’s REST API using your token
  • It fetches your zones (that you have permission to), then lists DNS records for the selected zone
  • Changes you make are sent as API calls; responses are shown and propagated immediately
  • Your token can be remembered locally on your machine if you opt in

Create a Cloudflare API token

Sometimes you want to give a colleague or partner access to one domain, or even all.
You can do this without inviting them into your Cloudflare account by issuing a restricted token.

Go to My Profile > API Tokens > Create Token.
Choose Custom Token (or start from “Edit zone DNS” and adjust).

Permissions:
Zone.DNS: Edit
Zone.Zone: Read

Resources:
Include > Specific zone (recommended) or All Zones

Optional:
Set an expiration date so access ends automatically
Add an IP filter to restrict where the token can be used from
Create the token and share only this token with the person who needs access.
They can paste the token into API CDNS Manager and will see only that zone.

Installation

  • Windows desktop app (portable)
  • No additional dependencies required
  • For now, only Windows

Download: https://trustmyl.ink/cdns-download

How to Configure Portainer CE with Entra ID for OAuth Authentication

Portainer CE by default doesnt support Entra ID (formerly Azure AD) for SSO.
Mostly because it’s for non-commercial use, but I actually have a private Microsoft 365 tenant for myself, so I wanted to use Entra ID Authentication for that.

With this guide, I will tell you how you can use custom oAuth to configure Entra ID sign in, since it wasn’t a breeze to find out myself.


Why Use Entra ID with Portainer CE?

  • Single Sign-On (SSO): Use Entra ID credentials to log in to Portainer.
  • Enhanced Security: Enforce policies such as multi-factor authentication (MFA) via Entra ID.
  • Simplified User Management: Centralize access control through your existing Entra ID setup.

Prerequisites

  1. A running instance of Portainer CE (version 2.9 or later).
  2. An Entra ID tenant (part of a Microsoft 365 or Azure subscription).
  3. Administrative privileges on both Entra ID and Portainer CE.

Step 1: Register an App in Entra ID

  1. Log in to Entra ID Portal:
  1. Create a New App Registration:
  • Go to Azure Active Directory > App Registrations > + New Registration.
  • Provide a name for the app (e.g., Portainer OAuth).
  • Set Supported Account Types:
    • Single Tenant (if only your organization will use Portainer).
  • Add a Redirect URI:
    • Type: Web
    • URI: https://<your-portainer-url>
    • Replace <your-portainer-url> with your Portainer CE domain or IP address. (HTTPS is required for SSO)
  • Click Register.
  1. Save the Key Details:
  • After registration, copy:
    • Application (client) ID
    • Directory (tenant) ID

Step 2: Configure Permissions in Entra ID

  1. Add API Permissions:
  • Go to API Permissions > + Add a permission.
  • Select Microsoft Graph > Delegated Permissions.
  • Add:
    • openid
    • profile
    • email
  • Click Grant admin consent to apply permissions for all users.
  1. Create a Client Secret:
  • Go to Certificates & Secrets > + New Client Secret.
  • Add a description (e.g., Portainer OAuth).
  • Set an expiration period (e.g., 12 months).
  • Save the Client Secret value. You’ll need it for Portainer.

Step 3: Configure Custom OAuth in Portainer CE

  1. Log in to Portainer:
    Access your Portainer CE instance as an administrator.
  2. Navigate to Authentication Settings:
  • Go to Settings > Authentication.
  • Select the Custom OAuth provider.
  1. Enter the Entra ID OAuth Details:
    Use the following settings based on your configuration:
  • Client ID: <Your Application (client) ID>
  • Client Secret: <Your Client Secret>
  • Authorization URL: https://login.microsoftonline.com/<Your-Tenant-ID>/oauth2/v2.0/authorize
  • Access Token URL: https://login.microsoftonline.com/<Your-Tenant-ID>/oauth2/v2.0/token
  • Resource URL: https://graph.microsoft.com/v1.0/me
  • Redirect URL: https://<your-portainer-url>
  • Logout URL: https://login.microsoftonline.com/<Your-Tenant-ID>/oauth2/v2.0/logout
  • User Identifier: userPrincipalName
  • Scopes: openid profile
  • Auth Styles: in params

Step 4: Test the Integration

  1. Log out of Portainer and access the login page.
  2. You should see the OAuth login option.
  3. Authenticate using your Entra ID credentials.
  4. If successful, you will be redirected to Portainer’s dashboard, don’t forget to give the account permissions, because you can’t add it automatically to a team with the community edition of Portainer!

Common Issues and Troubleshooting

  1. Unauthorized Error:
  • Ensure that In Params is the Auth Style
  1. Redirect URI Mismatch:
  • Ensure the Redirect URI in Portainer matches exactly with what is configured in Entra ID, no oauth/callback as stated by some guides.
  1. Missing Claims:
  • Add optional claims in Entra ID:
    • Go to Token Configuration > + Add optional claim.
    • Add the following claims for the ID token:
    • email
    • name
    • upn (User Principal Name).
  1. Token Validation Errors:
  • Ensure openid, profile, and email scopes are properly configured and granted admin consent.

Conclusion

Integrating Portainer CE with Entra ID provides a secure and centralized authentication solution for your containerized environments. By leveraging OAuth, you can streamline user access, enforce MFA, and manage access control directly from Entra ID.

User interaction script for SCCM

This script (made by me) allows you to use user-interaction to notify your users about an installation or update of software.
It also allows you to push an installation (with administrator priviliges), while still including the user in the process.

If there is no interaction within 20 seconds per notification, it will go on.

You can also specify a process to check, and notify the user that the application needs to be closed to continue the installation (if the process is running off course).
It will re-check every 20 seconds, but will not continue until the process is closed.

This means that if the user isn’t behind his/her desk, and nothing conflicting is running, it will continue.
This makes the process of installing and updating software a lot more user friendly, but will not compromise compliance.

Download from Technet