How to Configure Portainer CE with Entra ID for OAuth Authentication

Portainer CE by default doesnt support Entra ID (formerly Azure AD) for SSO.
Mostly because it’s for non-commercial use, but I actually have a private Microsoft 365 tenant for myself, so I wanted to use Entra ID Authentication for that.

With this guide, I will tell you how you can use custom oAuth to configure Entra ID sign in, since it wasn’t a breeze to find out myself.


Why Use Entra ID with Portainer CE?

  • Single Sign-On (SSO): Use Entra ID credentials to log in to Portainer.
  • Enhanced Security: Enforce policies such as multi-factor authentication (MFA) via Entra ID.
  • Simplified User Management: Centralize access control through your existing Entra ID setup.

Prerequisites

  1. A running instance of Portainer CE (version 2.9 or later).
  2. An Entra ID tenant (part of a Microsoft 365 or Azure subscription).
  3. Administrative privileges on both Entra ID and Portainer CE.

Step 1: Register an App in Entra ID

  1. Log in to Entra ID Portal:
  1. Create a New App Registration:
  • Go to Azure Active Directory > App Registrations > + New Registration.
  • Provide a name for the app (e.g., Portainer OAuth).
  • Set Supported Account Types:
    • Single Tenant (if only your organization will use Portainer).
  • Add a Redirect URI:
    • Type: Web
    • URI: https://<your-portainer-url>
    • Replace <your-portainer-url> with your Portainer CE domain or IP address. (HTTPS is required for SSO)
  • Click Register.
  1. Save the Key Details:
  • After registration, copy:
    • Application (client) ID
    • Directory (tenant) ID

Step 2: Configure Permissions in Entra ID

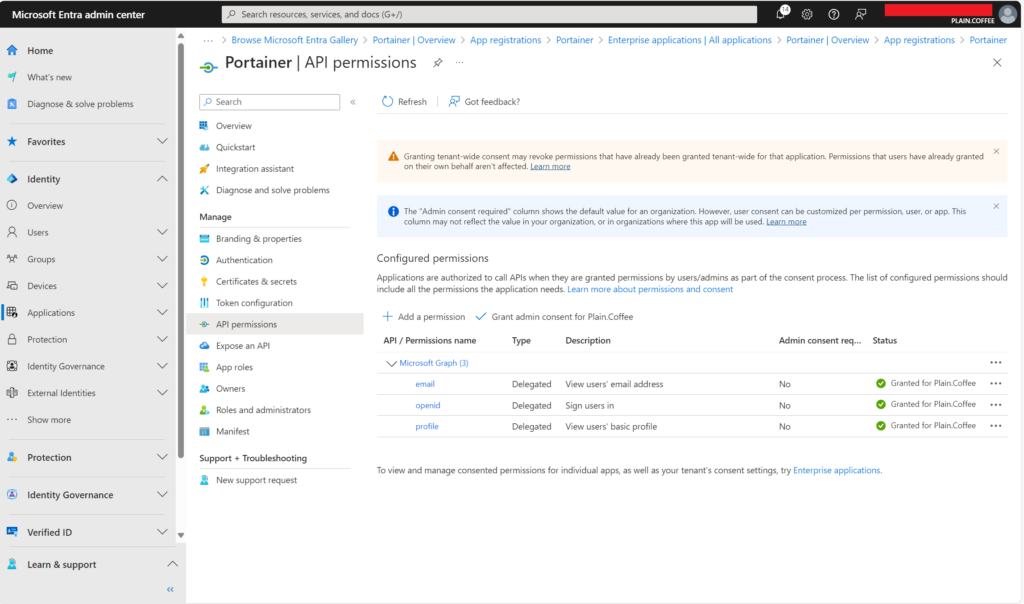
  1. Add API Permissions:
  • Go to API Permissions > + Add a permission.
  • Select Microsoft Graph > Delegated Permissions.
  • Add:
    • openid
    • profile
    • email
  • Click Grant admin consent to apply permissions for all users.
  1. Create a Client Secret:
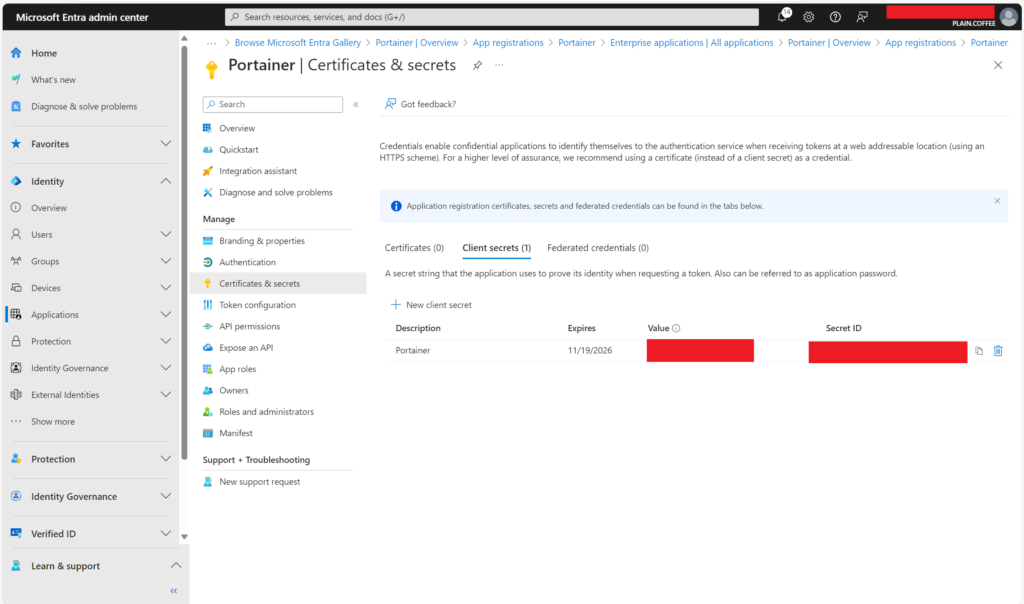
  • Go to Certificates & Secrets > + New Client Secret.
  • Add a description (e.g., Portainer OAuth).
  • Set an expiration period (e.g., 12 months).
  • Save the Client Secret value. You’ll need it for Portainer.
Step 3: Configure Custom OAuth in Portainer CE

  1. Log in to Portainer:
    Access your Portainer CE instance as an administrator.
  2. Navigate to Authentication Settings:
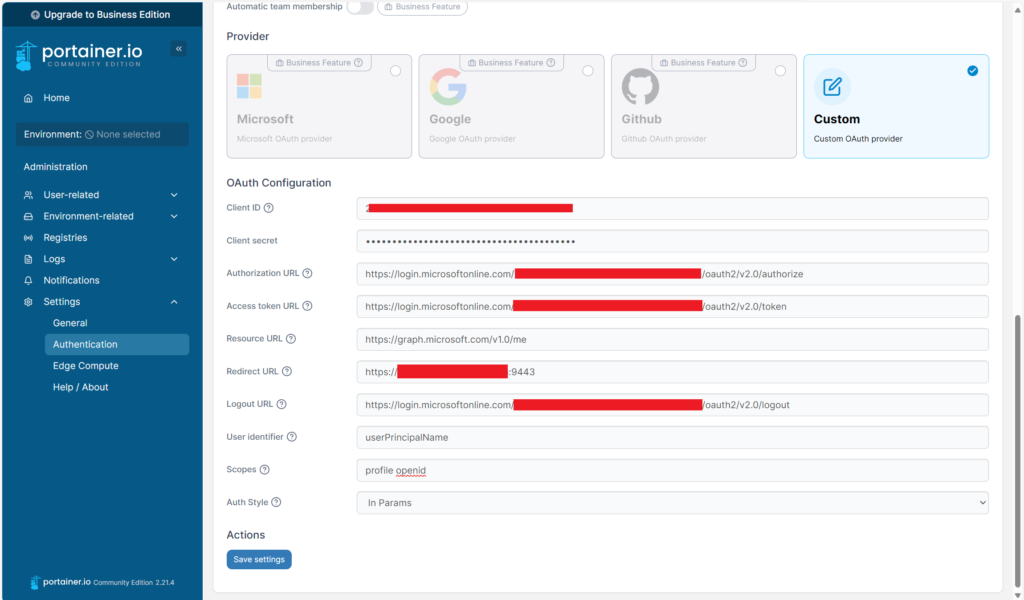
  • Go to Settings > Authentication.
  • Select the Custom OAuth provider.
  1. Enter the Entra ID OAuth Details:
    Use the following settings based on your configuration:
  • Client ID: <Your Application (client) ID>
  • Client Secret: <Your Client Secret>
  • Authorization URL: https://login.microsoftonline.com/<Your-Tenant-ID>/oauth2/v2.0/authorize
  • Access Token URL: https://login.microsoftonline.com/<Your-Tenant-ID>/oauth2/v2.0/token
  • Resource URL: https://graph.microsoft.com/v1.0/me
  • Redirect URL: https://<your-portainer-url>
  • Logout URL: https://login.microsoftonline.com/<Your-Tenant-ID>/oauth2/v2.0/logout
  • User Identifier: userPrincipalName
  • Scopes: openid profile
  • Auth Styles: in params

Step 4: Test the Integration

  1. Log out of Portainer and access the login page.
  2. You should see the OAuth login option.
  3. Authenticate using your Entra ID credentials.
  4. If successful, you will be redirected to Portainer’s dashboard, don’t forget to give the account permissions, because you can’t add it automatically to a team with the community edition of Portainer!

Common Issues and Troubleshooting

  1. Unauthorized Error:
  • Ensure that In Params is the Auth Style
  1. Redirect URI Mismatch:
  • Ensure the Redirect URI in Portainer matches exactly with what is configured in Entra ID, no oauth/callback as stated by some guides.
  1. Missing Claims:
  • Add optional claims in Entra ID:
    • Go to Token Configuration > + Add optional claim.
    • Add the following claims for the ID token:
    • email
    • name
    • upn (User Principal Name).
  1. Token Validation Errors:
  • Ensure openid, profile, and email scopes are properly configured and granted admin consent.

Conclusion

Integrating Portainer CE with Entra ID provides a secure and centralized authentication solution for your containerized environments. By leveraging OAuth, you can streamline user access, enforce MFA, and manage access control directly from Entra ID.

How AI can finally drive the chip industry to new heights

While everyone talks about what AI can do, less attention is given to how AI drives (much needed) innovation in the chip industry.
For years there was a well known monopoly in the PC industry, AMD and Intel ruled over the PC landscape.
There simply was no better alternative, and there was no incentive for chip manufacturers like Qualcomm to invest in the PC industry, because of the lack of innovation on the platform (Windows), and the lack of growth of the PC market.

AI-driven innovations offer new opportunities to revive Windows on ARM, a platform that was not successful in the past. This article compares the Qualcomm Snapdragon X Elite and Snapdragon X Plus with current chips from Intel and AMD, examines the challenges of previous Windows on ARM implementations, and discusses why these new innovations could make Windows on ARM successful.

The History of Windows on ARM

Windows RT was Microsoft’s first serious attempt to run Windows on ARM chips, launched in 2012 alongside the Surface RT tablet. It aimed to combine the energy efficiency of ARM with the power of Windows. Unfortunately, it suffered from a lack of compatibility with traditional x86 applications. Users could only run apps from the Windows Store, severely limiting usability. As a result, Windows RT was poorly received and eventually discontinued.

Windows 10 on ARM was Microsoft’s next attempt to run Windows on ARM chips. Initially, only x86 emulation was possible, meaning older 32-bit Windows applications could run, but performance was disappointing due to the emulation layer. Support for x64 emulation was added later, allowing 64-bit applications to run. Despite these improvements, performance still did not meet expectations because ARM processors were seen as ‘fast phone processors,’ inadequate for full-fledged laptops.

Qualcomm Snapdragon X Elite and X Plus

The Qualcomm Snapdragon X Elite and Snapdragon X Plus are the latest and most advanced ARM chips on the market, designed with a strong focus on AI performance and energy efficiency. Qualcomm specifically invested in developing these chips to address the shortcomings of previous ARM chips for Windows devices. The need to meet the requirements of AI-driven applications, such as Microsoft’s Copilot+, was a key driver for this investment.

Both chips offer advanced support for x86 and x64 emulation. Thanks to the new “Prism” emulation layer in Windows 11 on ARM, these chips significantly improve the performance of emulated applications. This means x86 and x64 applications run on ARM devices with minimal performance loss, crucial for the usability of Windows on ARM.

Comparison with Current Chips from Intel and AMD

Current x64 processors from Intel and AMD show different levels of AI performance:

  • Intel’s Meteor Lake: Offers up to 10 TOPS of AI performance, which does not meet the requirements for Microsoft’s Copilot+ certification.
  • AMD’s Ryzen 8040 series: Offers up to 16 TOPS of AI performance, also insufficient for Copilot+.

Competition and Innovation in the Chip Market

The introduction of the Snapdragon X Elite and X Plus could significantly accelerate competition in the chip market. Currently dominated by Intel and AMD, the PC chip market might see a broader range of manufacturers in the future. This could be similar to the smartphone market, where multiple companies compete with their own chips.

For example, Samsung has its Exynos processors, Google develops Tensor chips for its Pixel phones, and other major players in the mobile chip industry like MediaTek could also enter the PC market.

This diversification could lead to faster innovations, better performance, energy efficiency, and more choices for consumers.

Microsoft Copilot+ Certification

To be certified for Microsoft’s Copilot+, PCs must deliver at least 40 TOPS of AI performance. Many current x64 chips, such as Intel’s Meteor Lake and AMD’s Ryzen, do not meet this requirement. The Snapdragon X Elite and Snapdragon X Plus, with 45 TOPS for the NPU, do meet this standard and are currently the only chips that do.

Why Windows on ARM Can Succeed Now

The combination of improved performance and energy efficiency makes the Snapdragon X Elite and X Plus game-changers for Windows on ARM. With the ability to efficiently run AI-driven applications like Microsoft’s Copilot+, these chips meet the high performance standards needed for modern computers. Qualcomm and Microsoft have developed a powerful emulation layer that ensures x86 and x64 applications run smoothly on ARM devices, enhancing the usability and acceptance of Windows on ARM.

Conclusion

Despite past failures, the current generation of AI-optimized chips from Qualcomm offers new hope for Windows on ARM. The Snapdragon X Elite and X Plus outperform current x64 chips from Intel and AMD in AI performance. These investments in AI and chip innovation could ensure that Windows on ARM not only meets performance standards but also remains energy efficient, potentially leading to broader acceptance and success of the platform.

Automating Windows Server Environment Inventory with PowerShell

As IT administrators managing complex Windows Server environments, we are often tasked with keeping track of various server configurations, services, roles, and other essential aspects of our infrastructure. Manual tracking and documentation can be time-consuming and error-prone, which is why automating the inventory process is an excellent solution. In this blog post, we’ll introduce a comprehensive PowerShell script that automates the collection of critical data about your Windows Server environment and exports the information into organized CSV files for easy analysis.

Introducing the Windows Server Environment Inventory Script

The Windows Server Environment Inventory PowerShell script is designed to help administrators efficiently gather vital information about their infrastructure. The script consolidates data about servers, services, roles, shares, SMB connections, and certificates, allowing you to keep an eye on your environment and identify potential issues quickly.

Key Features
  • Comprehensive inventory of Windows Server environments
  • Collection of server details, connectivity, services, scheduled tasks, roles, shares, SMB connections, and certificates
  • Export of inventory data into organized CSV files for easy analysis and reporting
  • Automation of data collection process to improve efficiency and accuracy

Requirements and Setup

Before running the script, make sure you have the following requirements in place:

  • PowerShell 5.1 or later
  • Active Directory PowerShell Module
  • Appropriate permissions to query Active Directory, remote servers, and export CSV files

To get started, simply clone or download the project files to a local directory and ensure the Active Directory PowerShell Module is installed on your system.

Running the Script

Open a PowerShell session with administrative privileges and navigate to the directory containing the script. Execute the script by running the following command:

PS C:\> .\InventoryWindowsServerEnvironment.ps1

The script will collect information about Windows Servers in your Active Directory environment and generate multiple CSV files in the same directory as the script. These files can be opened and analyzed using spreadsheet software or other data analysis tools.

Analyzing the Results

The generated CSV files provide comprehensive information about your Windows Server environment, including:

  1. Server connectivity details (export-connectivityreport.csv)
  2. Services running on each server (export-services.csv)
  3. Scheduled tasks on each server (export-scheduledtasks.csv)
  4. Installed roles and features on each server (export-installroles.csv)
  5. File shares and file servers (export-fileshares.csv and export-fileservers.csv)
  6. SMB connections on each server (export-smbconnections.csv)
  7. Certificates from the Computer Personal store on each server (export-personalcertificates.csv)

You can use this data to monitor and manage your Windows Server environment, identify potential issues related to connectivity, services, roles, or certificates, and ensure your infrastructure is running optimally.

Conclusion

Automating the Windows Server environment inventory process with PowerShell is a powerful way to improve efficiency, accuracy, and maintainability. The Windows Server Environment Inventory script simplifies data collection, enabling you to focus on analyzing the results and addressing any issues that arise. By leveraging this script, you can keep your finger on the pulse of your infrastructure and ensure a robust and reliable Windows Server environment.

Download it at:
Windows Server Environment Inventory from Azure DevOps

Azure Bicep vs. Terraform: Comparing the Two Infrastructure as Code Tools

Infrastructure as Code (IaC) is becoming increasingly popular in today’s cloud computing landscape. It allows organizations to define and manage cloud resources in a declarative way, automating the process of resource deployment and configuration. Two popular IaC tools for Azure are Azure Bicep and Terraform. While they share some similarities, they also have several key differences.

Language and Syntax
Azure Bicep is a domain-specific language (DSL) that was designed specifically for Azure resources. It uses a YAML-like syntax that is easy to read and write. In contrast, Terraform uses its own language called HashiCorp Configuration Language (HCL). HCL is more flexible than Azure Bicep, as it can be used to define resources across multiple cloud providers, including Azure.

Resource Coverage
Azure Bicep provides a more comprehensive coverage of Azure resources, and is specifically designed for the Azure platform. It has built-in support for all Azure resources, including the latest features and services. In contrast, Terraform offers support for multiple cloud providers, including Azure, AWS, and Google Cloud Platform. However, its coverage of Azure resources may not be as comprehensive as Azure Bicep.

Deployment and Management
Azure Bicep integrates directly with Azure Resource Manager (ARM), which allows for easier deployment and management of resources. It also provides built-in support for features such as template validation and parameterization. Terraform, on the other hand, uses its own deployment engine and can be used to deploy resources to multiple cloud providers. It also provides a wide range of plugins and modules that allow for more advanced deployment and management scenarios.

Learning Curve
Azure Bicep has a smaller learning curve than Terraform, as it is specifically designed for Azure resources and uses a simpler syntax. This makes it easier for developers and IT professionals who are new to IaC to get started. Terraform, on the other hand, has a steeper learning curve due to its more complex language and wider range of capabilities.

Community and Ecosystem
Terraform has a larger and more active community than Azure Bicep. This means that there are more resources, tutorials, and support available for Terraform users. Terraform also has a wider range of third-party plugins and modules that extend its capabilities. However, Azure Bicep is growing in popularity and has an active community of developers contributing to its development.

In conclusion, both Azure Bicep and Terraform are powerful IaC tools with their own strengths and weaknesses. Azure Bicep is specifically designed for Azure resources, has a simpler syntax, and integrates directly with ARM. Terraform, on the other hand, is more flexible, has a wider range of capabilities, and can be used to manage resources across multiple cloud providers. The choice between these two tools will depend on your specific requirements and preferences.

High level step-by-step guide building an Azure Virtual Desktop environment using Azure Bicep

Azure Virtual Desktop is a cloud-based virtual desktop infrastructure (VDI) service that enables users to access their Windows desktops and applications from anywhere. Azure Virtual Desktop is an excellent solution for enterprises that want to provide their employees with secure and reliable remote access to their desktops and applications. In this blog post, we will discuss how to build an entire Azure Virtual Desktop environment using Azure Bicep.

Step 1: Set up your environment

Before you can create the Azure Virtual Desktop environment, you need to ensure that you have the necessary prerequisites, including an Azure subscription, a virtual network, and a Windows Active Directory domain. You can create a virtual network and Windows Active Directory domain in Azure using Azure Bicep.

Step 2: Define your infrastructure in Azure Bicep

Using Azure Bicep, you can define your infrastructure as code. You can create a Bicep file that defines your virtual network, virtual machines, storage accounts, and other necessary resources for your Azure Virtual Desktop environment. You can use the following resources in your Bicep file:

  • Virtual network
  • Subnet
  • Network security group
  • Storage account
  • Virtual machine
  • Windows Active Directory domain

The Bicep file should define the dependencies between these resources, so that Azure can deploy them in the correct order.

Step 3: Create a deployment script

Once you have defined your infrastructure in Azure Bicep, you need to create a deployment script that will deploy your infrastructure to Azure. This script will use the Azure CLI to deploy your infrastructure using the Bicep file you created. You can use the following commands to create and deploy the Azure Virtual Desktop environment:

  • az deployment group create: This command creates a new deployment for the specified resource group and deploys the Bicep file.
  • az deployment group validate: This command validates the Bicep file and checks for syntax errors.

You can also use Azure DevOps or other deployment tools to automate the deployment of your Azure Virtual Desktop environment.

Step 4: Install and configure Azure Virtual Desktop components

Once your infrastructure is in place, you need to install and configure the Azure Virtual Desktop components. This involves setting up the virtual machines, configuring the host pool, and installing the necessary software. You can use the following components in your Azure Virtual Desktop environment:

  • Host pool: This is a collection of virtual machines that provide remote desktop access to users.
  • Virtual machines: These are the virtual machines that host the desktops and applications.
  • Remote Desktop Session Host (RDSH): This is a Windows Server role that provides remote desktop services to users.
  • Windows Virtual Desktop Agent: This is the software that you install on the virtual machines to connect them to the Azure Virtual Desktop service.

You can install and configure these components using PowerShell scripts, Azure Automation, or other deployment tools.

Step 5: Test and validate

After you have set up your Azure Virtual Desktop environment, you need to test and validate it to ensure that everything is working as expected. You can do this by connecting to the virtual desktops and running various tests to ensure that everything is working correctly. You can also use Azure Monitor and other monitoring tools to monitor the performance and availability of your Azure Virtual Desktop environment.

Conclusion

In conclusion, building an entire Azure Virtual Desktop environment using Azure Bicep requires some expertise and planning. It is essential to understand the Azure Virtual Desktop architecture and components, as well as how to define infrastructure in Azure Bicep. However, by following these steps, you can build an Azure Virtual Desktop environment that is efficient, scalable, and easy to manage.

Why use Infrastructure as Code solutions like Azure Bicep or Terraform

When it comes to deploying infrastructure in the cloud, there are many tools available to choose from. Two popular choices are Azure Bicep and Terraform. Both of these tools are infrastructure as code (IaC) solutions, meaning that they allow you to define your cloud infrastructure in a declarative language and then deploy that infrastructure using automation. In this blog post, we will explore why using Azure Bicep or Terraform in an enterprise environment is beneficial.

Benefits of Using Azure Bicep or Terraform

Consistency and Reusability

In an enterprise environment, consistency and reusability are crucial. You need to ensure that your infrastructure is deployed in the same way every time and that your infrastructure components are reusable. This is where Azure Bicep or Terraform come in. These tools allow you to define your infrastructure in a declarative language, which means that your infrastructure will be deployed in the same way every time. Additionally, because you can reuse code in Azure Bicep or Terraform, you can create templates for your infrastructure components that can be used across different projects and environments.

Automation and Efficiency

Another benefit of using Azure Bicep or Terraform in an enterprise environment is automation and efficiency. By defining your infrastructure in code, you can automate the deployment process, which reduces the likelihood of human error and makes the deployment process more efficient. Additionally, because you can reuse code in Azure Bicep or Terraform, you can create templates that can be used across different projects and environments, which reduces the amount of time and effort required to deploy infrastructure.

Version Control

In an enterprise environment, version control is essential. You need to be able to track changes to your infrastructure over time, and you need to be able to roll back changes if necessary. With Azure Bicep or Terraform, you can use version control to track changes to your infrastructure code. This allows you to see who made changes, when those changes were made, and what those changes were. Additionally, you can roll back changes if necessary, which helps you avoid downtime or other issues that might arise from changes to your infrastructure.

Collaboration

Finally, collaboration is critical in an enterprise environment. You need to be able to work with other members of your team to deploy infrastructure, and you need to be able to share your infrastructure code with others. Azure Bicep or Terraform makes collaboration easy by allowing you to define your infrastructure in a declarative language that can be easily shared and understood by others. Additionally, because you can use version control with Azure Bicep or Terraform, you can collaborate on changes to your infrastructure code with others, which makes it easier to work together.

Conclusion

In conclusion, using Azure Bicep or Terraform in an enterprise environment offers numerous benefits, including consistency and reusability, automation and efficiency, version control, and collaboration. By using these tools, you can ensure that your infrastructure is deployed in the same way every time, reduce the amount of time and effort required to deploy infrastructure, track changes to your infrastructure code over time, and collaborate more effectively with others. If you are looking for an IaC solution for your enterprise, Azure Bicep or Terraform are both excellent choices to consider.

How can I overcome notification paralysis?

In the first part of this series, I will talk about notification paralysis.
We all suffer from it from time to time, you are taken into the momentum of the day.
The last thing you have time for are the red dots that hang above your apps.
Your phone rings, apps come in, Teams messages.
Not to mention apps that generate notifications that do not add anything to your productivity.
It also impacts your social availability to people around you.

I am going to talk about steps that will help you bring more order to your phone.

Why do apps send me notifications about useless stuff?

Apps that are advertising-based (think about Facebook and YouTube), are continuously trying to pull you into their app, because every time you open the app and see an advertisement, their revenue goes up.
It is that simple.

Apps you pay for are less likely to try to focus your attention on other things than their service (like advertisements), because it’s already paid for.
They are only sending notifications about things that interest you, because they want you to renew their service and the app not to be annoying to you.
It’s a different businessmodel.

There definitely are examples of apps you both pay for, but still try to gain your attention, but these still have advertisements, just less obvious ones.
Also, sometimes you don’t pay for the app to be advertising-free, but just for the functionality.
An example of this is LinkedIn Premium.

Be selective


To make sure I do not get notifications from apps I am not interested in, I categorize apps into the following categories:

  • Apps that can send me instant notifications
  • Apps that interest me, but that can send me notifications a maximum of two times a day
  • Apps that I use when I need them, but that are not allowed to send notifications

By default, every app falls into the category of apps that I use when I need them, but that are not allowed to send notifications.

So how do you assess this?


In general, apps that are allowed to send me notifications directly are apps that are time dependent.
These are messaging apps like WhatsApp, but also apps like my car’s, so I know when my car alarm goes off.

Apps that interest me are apps like LinkedIn, my favorite news app, but also my podcast app which notifies me when there are new episodes of my favorite podcast.
I have delayed notifications for these apps twice a day, one time before work and one time afterwards.

Apps that I use when I need them but are not allowed to send notifications are apps from, for example, my regular supermarket.
I get notifications every day that I have offers ready, but this only makes me go shopping on days when I do not need anything.
This is one of many examples.

How do you do this?

Every app on an iPhone has its own notification settings.
When you set up delayed notifications for your first app, it will make you set it up so you can use it for every next app you want to use this for.

It will ask for things like:

  • Do you still want notification badges throughout the day, even when you didn’t get the notifications itself (don’t recommend that, you’ll get curious)?
  • Do you want the block of delayed notifications visible throughout the day (don’t see the added value there, you know why?)
  • When do you want the delayed notifications to arrive?

But I have adaptive wishes and requirements for notifications throughout the day

This is very recognizable, when I am at work, I need Outlook, my Teams app and whatsapp.
I do not need other distracting things like Facebook Messenger at such a time.

When I am at home, I do not want to get notifications from work all evening, then my Outlook app is also on silent.
That is not to say I do not open the apps in question during the evening, but only when I feel like it and have time.

For this you can use focus profiles, which you can automatically switch on when you arrive at work.
You’ll also have different notifications settings in this profile, which can come in handy.

If you work in various locations, it may be useful to set this based on the day and time.

Automate

As I mentioned earlier, you can, for example, set which focus profile to choose based on your location or day/time.
Yet you can set it much more automatically than that.
For example, you can set that when your focus profile “work” is enabled, your volume is adjusted automatically, or even that a file keeps track of what time you arrived at work.

How do I set this up?

In the coming period there will be tutorials on my blog, to tell you more about this.

What is next

Next time, I will elaborate on limiting app usage.

Action and decision log Template

This document template is an action and decision log, used to track all actions and decisions taken during a meeting.

In addition to taking minutes of meetings, it’s a clever idea to keep a record of all actions and make sure everyone is aware of the actions they are responsible for.

And record all decisions of a person of authority, so that there is no doubt about who decided what.

By sending this list and putting it in a convenient place, it becomes clearer which actions had to be performed and who made the decisions.
During a project, for example, it becomes easier to hold someone accountable if they have decided something they should not have been allowed to do.
It is also important that if someone is absent for a long time, all the actions of that person are transparent, so that they can easily be placed with someone else.

In the case of a project, it is advisable to place all actions recorded during a project-meeting, in a project management application, with a reference to the document, so that all actions resulting from a meeting are also included in the day-to-day operations of a project.

Download the file here (English):
https://cloudaap.com/wp-content/uploads/2021/12/Action_Decision_Log_Template_EN.xltx

Download the file here (Dutch):
https://cloudaap.com/wp-content/uploads/2021/12/Action_Decision_Log_Template_NL.xltx


Meeting Agenda Template

This document template is an meeting agenda, used prepare for a meeting.

Every meeting runs smoother when you know in advance what is going to be spoken about.
Apart from that, it is also a way to make sure that people prepare better for a meeting, by asking them to bring items to the meeting outside the agenda.

With this document template you can easily prepare for a meeting, making sure that everything runs smoothly.
Make sure it is stored in a central place.

Download the file here (English):
https://cloudaap.com/wp-content/uploads/2023/02/Meeting_Agenda_EN_V2.dotx

Download the file here (Dutch):
https://cloudaap.com/wp-content/uploads/2023/02/Meeting_Agenda_NL_V2.dotx

Universal Cloud Print Preview

I love it, but do customers too?

I love how this solution is this easy to implement, and how this brings the ease of a modern workspace with a fitting printing solution on the user end.
The experience to the user is simply amazing, and I think is took some real effort on Microsoft’s end.
So, they did nice work on that.

However, there are some limitations:
Follow me or badge printing are simply not possible for now.
Physically added paper bins can’t be added.
Auto-stapling is not available.

I understand that these are added functionality by the printer manufacturers, but organizations have bought these machines fitting to their printing needs, you can’t take this away by implementing this.

And it’s all because you don’t have a native print driver.
Don’t get me wrong, I hate native printer drivers.
Without driver isolation on, you can destroy printing for so many clients.
Especially in large organizations, this has been an enormous issue.
Something you can’t blame Microsoft for, because it was simply bad programming on the printer manufacturers end.
Alot of them where using legacy shared components (a lot of printer drivers used old HP LaserJet Components, which would conflict and make peoples print spoolers crash in the past).

I think a wide alliance with Printer Manufacturers is necessary to make this happen, since we can only implement this in doctors’ offices or organizations where there are as many printers as people.

However, I love how this really brings an end to crashing print spoolers and printer configuration issues.

As companies are getting increasingly paperless, this solution gets more fitting by time, I think.
For legacy organizations, with comprehensive printing requirements, I think we may also have to start thinking about other ways to make sure printing is implemented in a fitting way.
Being creative has been a real help before, a lot of solutions are available, so maybe this will be a big competitor too.